Building a Dinoot Trailer
I suppose I wasn’t so different for everyone else with a Jeep. I had too much stuff and too little space to put it in.

A little research on the internet and I was overwhelmed by all the great off-road trailers available; there truly is something for everyone. My budget and desire for something that was multi-purpose were my major constraints in selecting a trailer. I found some trailers were way over the top, and way more than I needed for a weekend fishing trip. Others, like the off-road teardrop trailers I had seen seemed like they were only good for only one thing – camping. After all of my research, I decided a utility trailer would be the most versatile for my needs. It would serve as place to store dog crates when bird hunting, a platform for photography or varmint hunting, and a place to haul luggage when my wife and I went to visit her mother.
 Slowly, over time, the rig I wanted started to piece together what I wanted my trailer to be. Further research led me to Scott Chaney at Compact Camping Concepts and the Dinoot DIY trailer. The build it yourself job was attractive to me as I was looking for a winter project. Also, the possibility of customizing a trailer exactly as I needed appealed to me. Although I’ve practiced orthodontics for 25 years, I have what I consider only moderate fabrication skills. I love a project and learning new things, so I thought building a trailer would be a great way to spend the winter.
I finally decided to take the plunge and made a phone call to Dinoot. Before I knew it, I was speaking directly to the guy that could answer the questions I had. Scott was able to give me the advice and direction I needed to take on a project like this. I had envisioned a triple-decker trailer, one with a rack for a small Jon boat and a rooftop tent. Scott listened to my ideas and then suggested mounting the boat to my roof to simplify setup in camp.
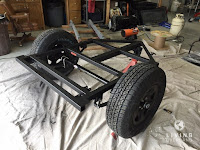
 Scott went thru the build sheet and order form with me, helping me select the right setup for my needs. We settled on their compact J series Dinoot with a welded frame as a base of the build. 3500# axles with 5 on 5.5 hubs and 1250# springs, with optional shock absorbers, were added to support the weight of my gear. I had already decided on the three-axis Loc N Roll hitch, so that was added to the list. I figured all of this would be great on the road, and I’d still have a very capable off-highway outfit that would be easy to tow behind my slightly modified 4.3-liter Chevy V6, ’92 YJ., and I became part of the Dinoot trailer fraternity.

Waiting the four weeks for my kit to be assembled and shipped was the hardest part of the build. Let me say that Scott is very knowledgeable and was very helpful throughout my build. To save money on shipping, I had my kit drop shipped to a relative’s rental yard. All my parts came in one package on a pallet, which made it easy to haul home. It didn’t take too long to get the metal parts into primer, so I could start assembling.
Scott had sent me the assembly instructions when I placed my order. The instructions were complete, well-illustrated and very easy to read and follow. I made the trailer floor as per the instructions from ¾” CVX plywood while I was waiting for the kit to arrive.

I primed most of the metal parts with several cans of spray primer and used a rattle can spray on bed liner with a little texture over that. My thoughts were it would be a durable coating that could easily be touched up after the inevitable beating the trailer would take. After using the trailer for a summer, that was a pretty good choice.

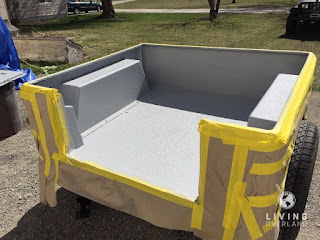 After I bolted the floor to the frame, the fiberglass tub was fitted and assembled. I’ll admit to a little trepidation when it came time to cut out the tub for the fender flares and wheels. Then with the tub in place, the inner fenders could be positioned and marked to be fiberglassed in.
With the tub now attached to the floor and frame, I decided to use a spray on polyurethane pickup bed liner on the inside and outside of the trailer. For this I used Raptor Lining, sprayed with the gun in the kit at about 70psi for a finer texture. The lining has proven to be very durable, waterproof and had enough body to cover up the grain of the plywood floor and seal all the perimeter seams. I’d never done anything like this and was surprised how easily the process was and how well it turned out. I like the semi-matte finish and the ease any bashes and scrapes are touched up.

The tailgate went on, and I wired the trailer with the LED light kit that you can get from Dinoot. Having dealt with trailer wiring demons in the past, I ran all the wires from the individual lights to a junction block attached to the underside of the floor in a safe place between frame rails. I was careful to make sure all the wires were tucked up out the way and secured well, thinking that at some point a sagebrush would find them, no matter what I do.


Scott had posted step by step instructions to build a hard top to enclose the trailer on the TVenturing forum. My son in law and I spent a Saturday together putting one together for my trailer using birch plywood and poplar 1x2’s. We built the frame by gluing and screwing everything together and used a router to finish the edges. A little body filler and sanding to smooth things out and then it was ready for the finish. Since I’d had such good luck with the Raptor Lining, I decided to shoot the outside with that. In a word – it turned out looking great.


With the body of the trailer essentially finished, it was time for the fun part – customizing the trailer to truly make it mine. I started with a Harbor freight rack for the tongue and an aftermarket TJ rear bumper I bought online. With a little expert supervision and my first-time welding, I made a bracket to bolt the bumper on and then welded that bracket to the trailer frame. The weight of the bumper made the trailer too light on the tongue, and so I decided to add a trailer spare tire up front.

I wanted to build a rack to support the rooftop tent. I bought a welder and watched a bunch of YouTube videos. Practiced first and then got brave enough to start fabricating the rack. I added a bracket on the front and bolted on the spare tire and jerry jug carriers. The wraparound on the front was designed to protect the corner of the tub and to have a step when opening and closing the RTT.
My idea was to make everything modular, and so I could take it off at some point and have different top racks for a canoe or kayaks or maybe a platform to get up on for photography or varmint hunts. Although I haven’t gotten that far yet, I did learn that it wasn’t rigid enough bolting the rack to the tongue and have since welded the front piece to the frame along with the bolts. The back of the rack flexed as the front got loose and tore the original mounting plates. So, I’ve reinforced those as well. You do it over until you get it right, I guess…
 I got a great deal online on a Cascadia vehicle top tent and mounted it on the rack. Scott sold me a side table kit, and I made that from birch plywood and sprayed it with the Raptor lining I had left over. I travel a quite a bit for work and didn’t have much time to use it last spring but got a night in up a local canyon as a shakedown trip. The trailer tows like a dream, and after years of horseback camping, it is nice not to be sleeping on the ground. I found out a few things from the first night and added some items to the list to add to the trailer.
I’ve since added a 9-gallon water tank with a gravity feed and LED work lights to the outside of the trailer. It’s nice not to have to mess with water jugs, and when you fish until dark the lights make it so much easier to find your stuff and cook dinner

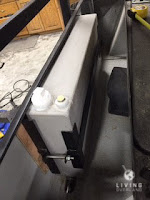

 The lights are 1380 lumen LED work lights. They are bright and only draw 780 milliamps. To prevent the fasteners from backing out from vibration, I attached the lights using a clevis pin, a spring, and a cotter pin. I wired the lights with individual switches and inline fuses to 30 amp hour deep cycle U1 battery I mounted in a battery box inside the front of the trailer. I plug in a battery minder when the trailer is parked, and I’ve never run the batteries out camping yet. I use the battery to run the lights, so I have plenty of power.

I have also fitted the trailer with a Road Shower, which gives me five more gallons of solar heated water in a pressurized tank to clean off with. After a couple of trips, I also reworked the front to move the spare tire and extra gas to lower the center of gravity.

I’m not sure you ever finish a project like this. There is always one more idea that comes from the last trip or something else you wished you had. I’m probably not thru fussing with the rooftop tent and where the road shower goes, but I can use my rig just like it is until I figure it out.
Good luck to any of you that are looking for a great project and a great rig. There are so many good products and trailers out there to choose from. The Dinoot satisfied my need for a lightweight, inexpensive off-road camping platform and my need for a great winter project. Very satisfying to say you built it yourself, just the way you wanted it.
Rough roads and dusty trails!
 Myron Guymon lives in River Heights, Utah. He is a retired orthodontist that stays busy with old car and old boat restoration projects. He is an avid fisherman, skeet shooter, adventure seeker and best of all- Grayson’s grandpa.

A little research on the internet and I was overwhelmed by all the great off-road trailers available; there truly is something for everyone. My budget and desire for something that was multi-purpose were my major constraints in selecting a trailer. I found some trailers were way over the top, and way more than I needed for a weekend fishing trip. Others, like the off-road teardrop trailers I had seen seemed like they were only good for only one thing – camping. After all of my research, I decided a utility trailer would be the most versatile for my needs. It would serve as place to store dog crates when bird hunting, a platform for photography or varmint hunting, and a place to haul luggage when my wife and I went to visit her mother.
 Slowly, over time, the rig I wanted started to piece together what I wanted my trailer to be. Further research led me to Scott Chaney at Compact Camping Concepts and the Dinoot DIY trailer. The build it yourself job was attractive to me as I was looking for a winter project. Also, the possibility of customizing a trailer exactly as I needed appealed to me. Although I’ve practiced orthodontics for 25 years, I have what I consider only moderate fabrication skills. I love a project and learning new things, so I thought building a trailer would be a great way to spend the winter.
I finally decided to take the plunge and made a phone call to Dinoot. Before I knew it, I was speaking directly to the guy that could answer the questions I had. Scott was able to give me the advice and direction I needed to take on a project like this. I had envisioned a triple-decker trailer, one with a rack for a small Jon boat and a rooftop tent. Scott listened to my ideas and then suggested mounting the boat to my roof to simplify setup in camp.


Waiting the four weeks for my kit to be assembled and shipped was the hardest part of the build. Let me say that Scott is very knowledgeable and was very helpful throughout my build. To save money on shipping, I had my kit drop shipped to a relative’s rental yard. All my parts came in one package on a pallet, which made it easy to haul home. It didn’t take too long to get the metal parts into primer, so I could start assembling.
Scott had sent me the assembly instructions when I placed my order. The instructions were complete, well-illustrated and very easy to read and follow. I made the trailer floor as per the instructions from ¾” CVX plywood while I was waiting for the kit to arrive.


I primed most of the metal parts with several cans of spray primer and used a rattle can spray on bed liner with a little texture over that. My thoughts were it would be a durable coating that could easily be touched up after the inevitable beating the trailer would take. After using the trailer for a summer, that was a pretty good choice.

 After I bolted the floor to the frame, the fiberglass tub was fitted and assembled. I’ll admit to a little trepidation when it came time to cut out the tub for the fender flares and wheels. Then with the tub in place, the inner fenders could be positioned and marked to be fiberglassed in.
With the tub now attached to the floor and frame, I decided to use a spray on polyurethane pickup bed liner on the inside and outside of the trailer. For this I used Raptor Lining, sprayed with the gun in the kit at about 70psi for a finer texture. The lining has proven to be very durable, waterproof and had enough body to cover up the grain of the plywood floor and seal all the perimeter seams. I’d never done anything like this and was surprised how easily the process was and how well it turned out. I like the semi-matte finish and the ease any bashes and scrapes are touched up.

The tailgate went on, and I wired the trailer with the LED light kit that you can get from Dinoot. Having dealt with trailer wiring demons in the past, I ran all the wires from the individual lights to a junction block attached to the underside of the floor in a safe place between frame rails. I was careful to make sure all the wires were tucked up out the way and secured well, thinking that at some point a sagebrush would find them, no matter what I do.


Scott had posted step by step instructions to build a hard top to enclose the trailer on the TVenturing forum. My son in law and I spent a Saturday together putting one together for my trailer using birch plywood and poplar 1x2’s. We built the frame by gluing and screwing everything together and used a router to finish the edges. A little body filler and sanding to smooth things out and then it was ready for the finish. Since I’d had such good luck with the Raptor Lining, I decided to shoot the outside with that. In a word – it turned out looking great.


With the body of the trailer essentially finished, it was time for the fun part – customizing the trailer to truly make it mine. I started with a Harbor freight rack for the tongue and an aftermarket TJ rear bumper I bought online. With a little expert supervision and my first-time welding, I made a bracket to bolt the bumper on and then welded that bracket to the trailer frame. The weight of the bumper made the trailer too light on the tongue, and so I decided to add a trailer spare tire up front.

I wanted to build a rack to support the rooftop tent. I bought a welder and watched a bunch of YouTube videos. Practiced first and then got brave enough to start fabricating the rack. I added a bracket on the front and bolted on the spare tire and jerry jug carriers. The wraparound on the front was designed to protect the corner of the tub and to have a step when opening and closing the RTT.
My idea was to make everything modular, and so I could take it off at some point and have different top racks for a canoe or kayaks or maybe a platform to get up on for photography or varmint hunts. Although I haven’t gotten that far yet, I did learn that it wasn’t rigid enough bolting the rack to the tongue and have since welded the front piece to the frame along with the bolts. The back of the rack flexed as the front got loose and tore the original mounting plates. So, I’ve reinforced those as well. You do it over until you get it right, I guess…
 I got a great deal online on a Cascadia vehicle top tent and mounted it on the rack. Scott sold me a side table kit, and I made that from birch plywood and sprayed it with the Raptor lining I had left over. I travel a quite a bit for work and didn’t have much time to use it last spring but got a night in up a local canyon as a shakedown trip. The trailer tows like a dream, and after years of horseback camping, it is nice not to be sleeping on the ground. I found out a few things from the first night and added some items to the list to add to the trailer.
I’ve since added a 9-gallon water tank with a gravity feed and LED work lights to the outside of the trailer. It’s nice not to have to mess with water jugs, and when you fish until dark the lights make it so much easier to find your stuff and cook dinner


 The lights are 1380 lumen LED work lights. They are bright and only draw 780 milliamps. To prevent the fasteners from backing out from vibration, I attached the lights using a clevis pin, a spring, and a cotter pin. I wired the lights with individual switches and inline fuses to 30 amp hour deep cycle U1 battery I mounted in a battery box inside the front of the trailer. I plug in a battery minder when the trailer is parked, and I’ve never run the batteries out camping yet. I use the battery to run the lights, so I have plenty of power.
I have also fitted the trailer with a Road Shower, which gives me five more gallons of solar heated water in a pressurized tank to clean off with. After a couple of trips, I also reworked the front to move the spare tire and extra gas to lower the center of gravity.
I’m not sure you ever finish a project like this. There is always one more idea that comes from the last trip or something else you wished you had. I’m probably not thru fussing with the rooftop tent and where the road shower goes, but I can use my rig just like it is until I figure it out.
Good luck to any of you that are looking for a great project and a great rig. There are so many good products and trailers out there to choose from. The Dinoot satisfied my need for a lightweight, inexpensive off-road camping platform and my need for a great winter project. Very satisfying to say you built it yourself, just the way you wanted it.
Rough roads and dusty trails!
 Myron Guymon lives in River Heights, Utah. He is a retired orthodontist that stays busy with old car and old boat restoration projects. He is an avid fisherman, skeet shooter, adventure seeker and best of all- Grayson’s grandpa.
___________________________
If you found this article helpful, please consider using one of the affiliate links below. The price is the same for you, but a small percentage of the purchase price goes to us, which helps keep this site going. Thank you!